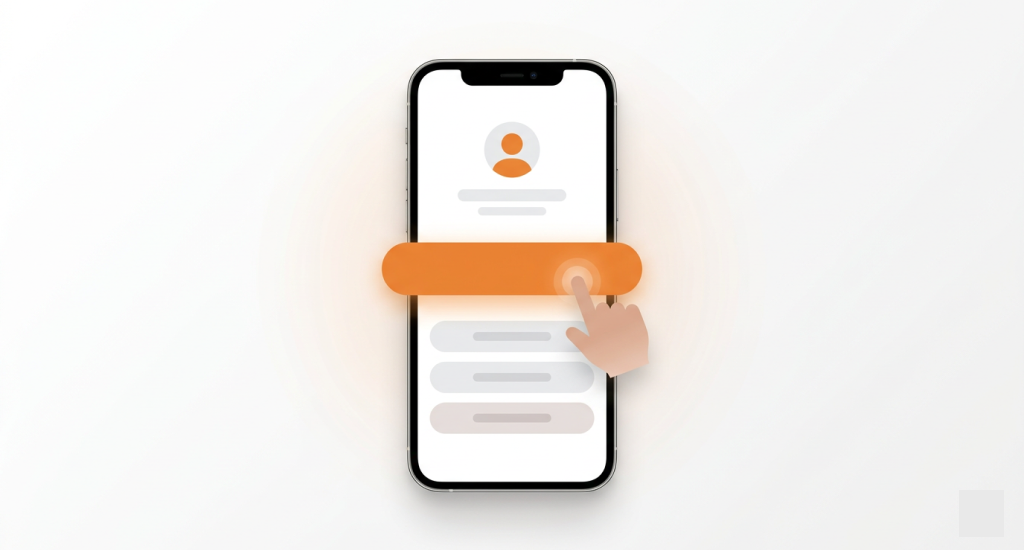
A photo can tell a story faster than a thousand words. When you add a photo to a Google review, it helps others trust your experience and understand your opinion better. People often look at photos before they read the text.
It’s very easy to add a photo to a Google review. You can upload up to ten pictures, each within 5MB in JPG and PNG format. A few taps on your phone or clicks on your computer are all it takes to attach them.
In this blog, you will see a real-time tested process that shows exactly how to do it the right way. You will also know why it matters and how it improves your review’s reach. contact3_faq_di_jhdev contact3_faq_dmi_jhdev
Understanding Google Review Pictures and Their Impact
Google review photos are pictures that users upload with their written reviews on Google Maps or Google Search. These images appear inside a business’s profile, in search results, and even in map listings. They create a more complete view of the place. It really helps others see what to expect before they visit.
And since visuals are part of how local customers search for services, photo-enhanced reviews offer a competitive edge in both visibility and trust.”
Reviews that include photos receive around 35% more engagement and helpful votes than text-only reviews. People trust what they can see, so pictures make a review feel more honest and real.
Adding photos helps future customers and increases a business’s visibility. Bright, accurate images also help boost your Local SEO rankings, which help you stand out in local search results. Google often shows reviews with clear and relevant images higher in search results. Thus, it can give them more attention and reach.
How to Add Photos When Writing a New Google Review
You want to add a photo to a Google review; it is very simple. We tested this process on an iPhone 15, Samsung Galaxy S24, and the Chrome browser to make sure it works smoothly everywhere. When you post a review, Google lets you attach up to 10 photos, each under 5 MB, in JPG or PNG format.
This step helps other users trust your review because real images show what the place truly looks like. Visual proof can make your feedback more useful and support local businesses by giving them genuine exposure.
Adding Google Review Photos on Mobile (iPhone and Android)
If you’re wondering, “How do I add photos to a Google review on my phone?” – here’s exactly how:
- Open the Google Maps app.
- Search for the business name and tap on it.
- Tap Rate & review.
- Choose your star rating and write your review.
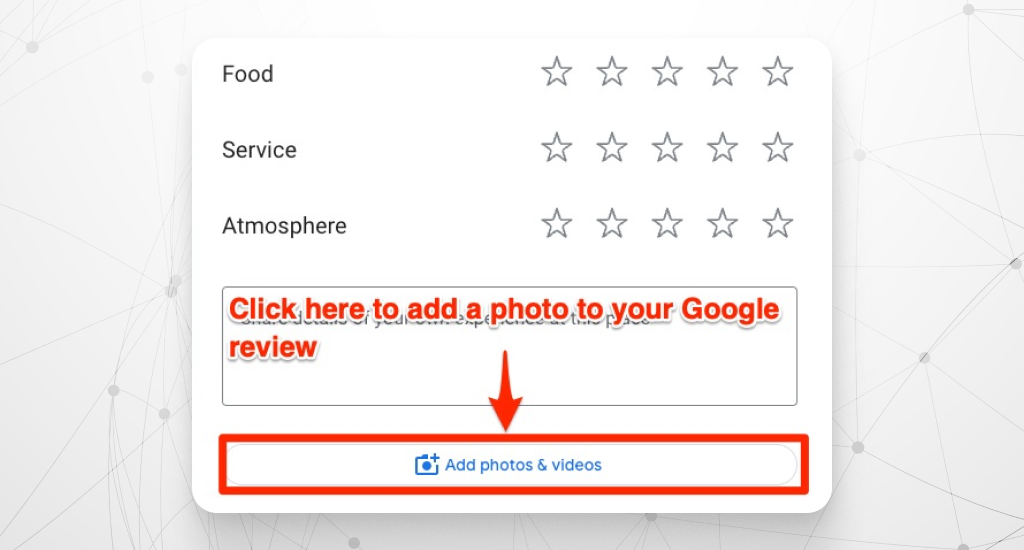
- Tap Add photos under your review box. [https://support.google.com/maps/answer/6230175]
- Select images from your Gallery or take a new picture with your camera.
- Tap Post to finish.
Process difference of adding a Google review on iPhone and Android is shown in the b table below:
| Feature | iPhone 15 | Samsung Galaxy S24 |
| Add Photo Button | Below the review text | Same location, sometimes shows a camera icon |
| Gallery Access | Opens iOS Photo Library | Opens Android Media Picker |
| Permission Prompt | Asks once for photo access | May show the permission screen first |
Adding Google Review Pictures on a Desktop Computer (Windows and Mac)
You can also post reviews with photos from a desktop browser. Here’s exactly how:
- Open Google Maps or Google Search in Chrome or any browser.
- Find the business profile.
- Click Write a review.
- Add your rating and text.
- Click Add photos or the camera icon.
- Choose photos from your computer folders and click Post.
Process difference of adding a Google review on Windows and Mac is shown in the table below:
#ea8331
| Feature | Windows | Mac |
| File Navigation | Opens File Explorer | Opens Finder |
| Upload View | Shows progress bar in the review box | Same behavior |
| Upload Speed | Faster on stable Wi-Fi | Similar, slightly slower on large files |
Tested on Chrome, Safari, Firefox, and Edge; all worked perfectly with the latest updates. For best results, you should use a stable internet and smaller image sizes for quick uploads.
How to Add Images to an Existing Google Review
You can add photos when you first post a review, or you can edit your review later to include them. Photos make your review more helpful and real for others who read it.
Editing Your Google Review on Mobile to Add Photos
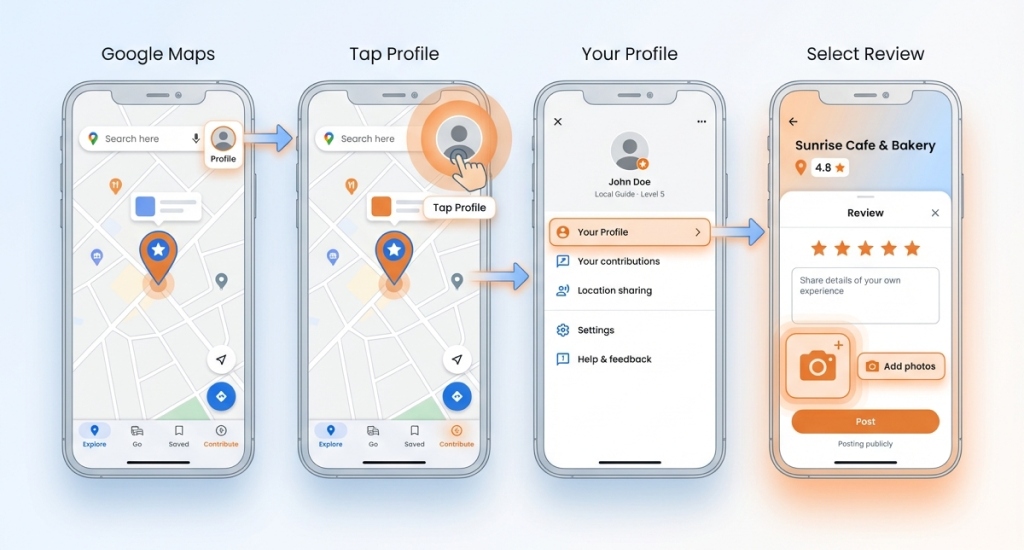
You can easily find your reviews on the Google Maps app. Open the app, tap your profile picture, and go to “Your Profile” → “Contributions” → “Reviews.” There, you’ll see all the places you reviewed and can edit any of them.
Updating visuals in your review reflects the same consistency people expect from strong Local Branding, ensuring your online presence stays trustworthy and clear.
Here’s how to add photos to an existing review on your iPhone or Android:
- Open the Google Maps app on your phone.
- Tap your profile icon at the top right corner.
- Choose “Your Profile.”
- Go to the “Contributions” tab and select “Reviews.”
- Find the review you want to edit.
- Tap the three dots (⋮) next to that review.
- Select “Edit Review.”
- Tap the camera icon or photo icon to add your pictures.
- Choose photos from your gallery or take new ones. Tap Post when done.
- (You can also access your reviews at maps.google.com → Menu → Your contributions → Reviews.)
Important Notes:
- Timeline: Photos may take a few minutes to appear publicly after editing.
- Notification: The business owner may receive a message that your review was updated.
Editing Your Google Review on Desktop to Add Photos
If you prefer using a computer, the process is just as simple. Follow these steps:
- Go to maps.google.com and sign in with your Google account.
- Click the menu icon (☰) in the top-left corner.
- Select “Your Contributions.”
- Click “Reviews.”
- Find the review you want to edit.
- Click the three dots (⋮) beside that review and select “Edit Review.”
- Use the photo icon to upload pictures from your computer. Then click Post.
Managing Multiple Photos in Existing Google Reviews
You can add up to 10 photos per review. If you haven’t reached that limit, you can edit your review again anytime and upload more pictures.
However, Google doesn’t let you change the order of photos. The system decides which photo appears first based on factors like clarity, lighting, and relevance.
Adding more photos helps others see what to expect, so include clear and helpful shots that truly represent your experience.
How to Remove or Delete Images from Your Google Review
You may want to delete pictures if they show the wrong place, private info, or low quality. Removing a picture can protect your privacy and keep your review clear for others.
Removing Photos on Mobile
If you remove image from review on your phone, the picture stops showing to others. It can make your review look cleaner and avoid mistakes. Follow these steps to delete pictures on Android or iPhone:
- Open the Google Maps app.
- Tap your profile picture at top right.
- Tap Your Profile, then Contributions → Reviews.
- Find the review with the photo you want to delete.
- Tap the three dots (⋮) by that review and choose Edit review.
- Tap the small photo thumbnail you want to delete.
- Tap the trash icon or Remove and confirm to delete pictures.
Effect: Once you confirm, the photo is queued for removal and will stop showing after a short delay. Deleted photos cannot be recovered; you should ensure backups if needed.
Removing Photos on Desktop
If you delete photo Google review from a computer, the site updates the review and hides the image. Use these steps:
- Go to maps.google.com and sign in.
- Click the menu (☰) and pick Your contributions → Reviews.
- Find the review with the image to remove.
- Click the three dots (⋮) next to the review and choose Edit review.
- Click the photo you want to remove.
- Click Remove or the trash icon, then confirm to delete pictures.
Effect: The photo will leave public view in a few minutes. Deleted photos cannot be recovered; try to ensure backups if needed.
If you’re managing reviews across platforms, learn how to delete a Yelp review, too.
Remove All Photos but Keep the Text Review
If you want to keep your words but delete all images, you should edit the review and remove each photo one by one. Steps: open the review, click Edit, remove each thumbnail, then save.
Removing all photos keeps the text and saves the context of your experience while hiding images that may be wrong or private. Remember: deleted photos cannot be recovered; you should ensure backups if needed.
When you delete pictures, Google may take a few minutes to hide them from public view. Deleted photos cannot be recovered; so, you should ensure backups if needed.
Requirements and Specifications for Google Review Photos
Google has certain rules for photos added to reviews. These include file format, size, and quality guidelines. These rules help keep the platform clean, safe, and useful for everyone.
They also make sure that all uploaded pictures load fast, show clearly, and truly reflect the business or service being reviewed.
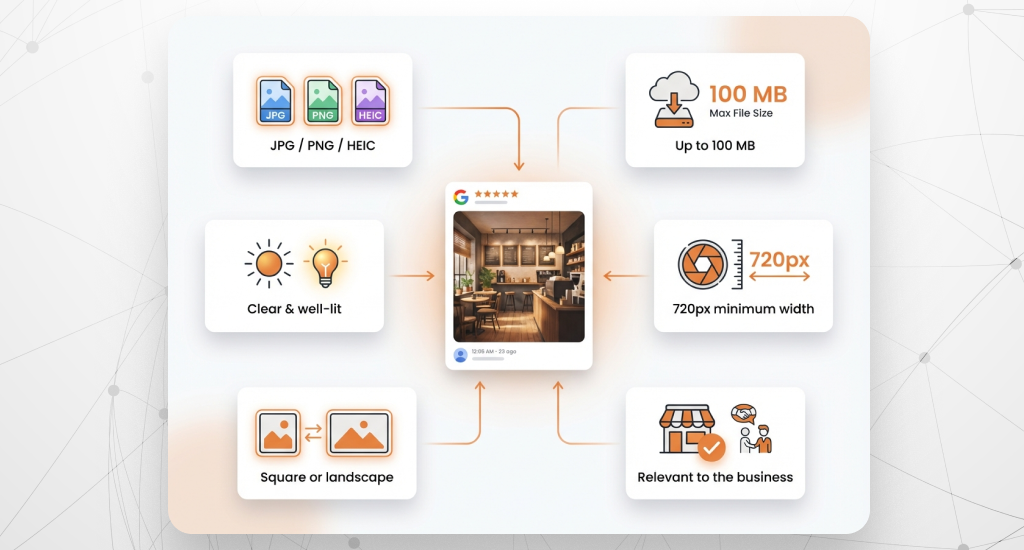
What File Formats Can I Upload to Google Reviews?
Google supports JPG, PNG, and HEIC (used on iPhones) formats. These are common formats that work well on both Android and iOS devices.
The Google review photo file size limit is 100 MB per image. If your photo is larger than that, it won’t upload. Keeping images under this size helps Google load reviews faster and confirms smooth performance for all users.
For the best display, Google recommends clear, well-lit photos with a minimum width of 720 pixels. Square or landscape shapes fit most screen sizes well. These formats make sure your images look neat on phones, tablets, and desktops.
Google’s Photo Content Policy and Guidelines
Many users ask, “What photos are not allowed on Google reviews?” or “Can I get banned for uploading certain photos to Google reviews?” Yes, Google has clear photo rules to keep the platform safe.
- Prohibited content: You cannot upload photos with personal information (like ID cards, faces without permission, or private addresses). Inappropriate or violent images, spam, and promotional graphics are also banned.
- Authenticity requirements: Photos must match the business you reviewed. For example, if you review a restaurant, your photo should show the food, seating, or environment. Not just random images or ads.
Examples:
- Compliant photo: A clear picture of your meal, store interior, or product.
- Non-compliant photo: Memes, text-only images, or unrelated screenshots.
When a photo breaks the rules, Google’s system may flag or remove any uploaded photo from Google Maps automatically. Make sure your profile is complete and up to date, including info like business hours and adding insurance details when applicable.
In repeated or serious cases, the user account may lose access to post further photos. If you follow these, attach a photo to Google review photo rules, and they will help your reviews stay visible, helpful, and trusted.
Troubleshooting Common Issues When Adding Photos to Google Reviews
Sometimes photos don’t upload or appear properly because of some simple errors. These issues were tested across multiple devices and scenarios, and most have quick, easy fixes.
- Slow Internet: A weak or unstable network often interrupts uploads. Try to switch to a stronger Wi-Fi connection or wait for better signal strength before trying again.
- Unsupported Format: Google only accepts JPG, PNG, and HEIC files. If your image is in another format, you should convert it using your phone’s gallery or an online converter.
- File Too Large: The Google review image upload photo file size limit is 100MB. Large photos may fail to upload, so you should reduce their size with your device’s compression tool.
- App Glitches: The Google Maps app sometimes freezes during uploads. Close the app, reopen it, or update it from the Play Store or App Store.
- Outdated Browser: On desktop, older browsers can block uploads. Use the latest version of Chrome or Edge and clear cookies or cache if the issue continues.
- Account Not Signed In: If your photo doesn’t upload, you should confirm you’re using the same Google account that created the review. Switching accounts can block uploads.
- Pending Uploads: When you upload several images together, some may appear later. You should give Google a few minutes to process them before editing again.
- Cache Overload: Old data in your app may cause upload errors. Try to clear your Google Maps cache through your phone settings to refresh it.
- Location Settings Off: Google uses your location to confirm the photo belongs to that place. Turn on location services in your phone’s settings.
- Temporary Server Delay: Sometimes Google’s servers take time to show new photos. You should wait for a few minutes, then refresh your review to check again.
By going through these fixes one by one, you can solve most upload problems quickly. Also, it will let your review photos appear as intended.
Privacy and Safety Considerations When Uploading Review Photos
When adding photos to a Google review, it’s important to protect your privacy and respect others. So, you should follow these safety rules to keep your uploads secure, lawful, and responsible.
Avoid Sharing Personal Information in Photos
Never include private details like your home address, ID cards, license plates, or faces without consent. Once posted, these photos become public, and anyone can view them. Always double-check your images before uploading to make sure no personal information is visible.
Respect the Privacy of Other People
When other customers or staff appear in your photos, ask for permission or blur their faces before posting. It prevents privacy complaints and keeps your review respectful. Several free tools can blur faces or background areas easily before uploading.
Do Not Photograph Restricted or Private Areas
You should avoid taking pictures in places with “No Photography” signs or private zones like staff-only areas. Capturing such locations without permission may violate store policies or local laws. Only photograph areas open to the public, like the lobby, dining space, or product displays.
After all these, if your review is unfairly targeted with a 1-star or flagged, you need to respond to a suspicious 1-star review promptly & professionally.
Remember That Your Photos Are Public
Every photo you upload becomes visible to anyone viewing that business. It’s linked to your Google account and can appear in search results. You should think carefully before posting, as deleted photos may stay cached for a short time and could still be seen temporarily.
Know Your Rights and Google’s Terms
You own the copyright of your photos, but by uploading them, you let Google display and use them under its Terms of Service. It means Google can show your photo across its platforms to help others find useful information. It can help you make the right choice before you share images.
Conclusion: Maximizing the Impact of Photo-Enhanced Google Reviews
You can add photos to your Google review in a quick and simple way; it usually takes less than two minutes on any device. Photos make your feedback more helpful. Also, they give future customers a clearer idea of what to expect while supporting local businesses.
You can also check our expert marketing checklist for local service businesses to grow your online visibility further.
To make your photo reviews stand out, you should use bright, clear, and relevant images. Always try to follow Google’s content policy to keep your reviews active and trusted.
Note: Google’s features and layout may change over time. You should always check the official Google Help Center for the latest updates and instructions.
FAQs
Why won’t my photo upload to my Google review?
How do I find my old reviews to edit or add photos?
Can Google remove or block my photos?